


A common problem...
You have a light switch in the wrong spot. Or, you would like to add another wall-switch to an existing light in a more convenient location (known here in Australia as a 2-way switch). Sounds easy enough, right?
Rarely! More often than not, it is very difficult (and very expensive), or even in some cases… impossible to run new wiring to your desired additional switch location.
So how to do we solve this problem?
A creative solution...
Using Shelly Wi-Fi devices, we can easily create a wireless 2-way switch. With little to no new wiring required – just “re-wiring”.
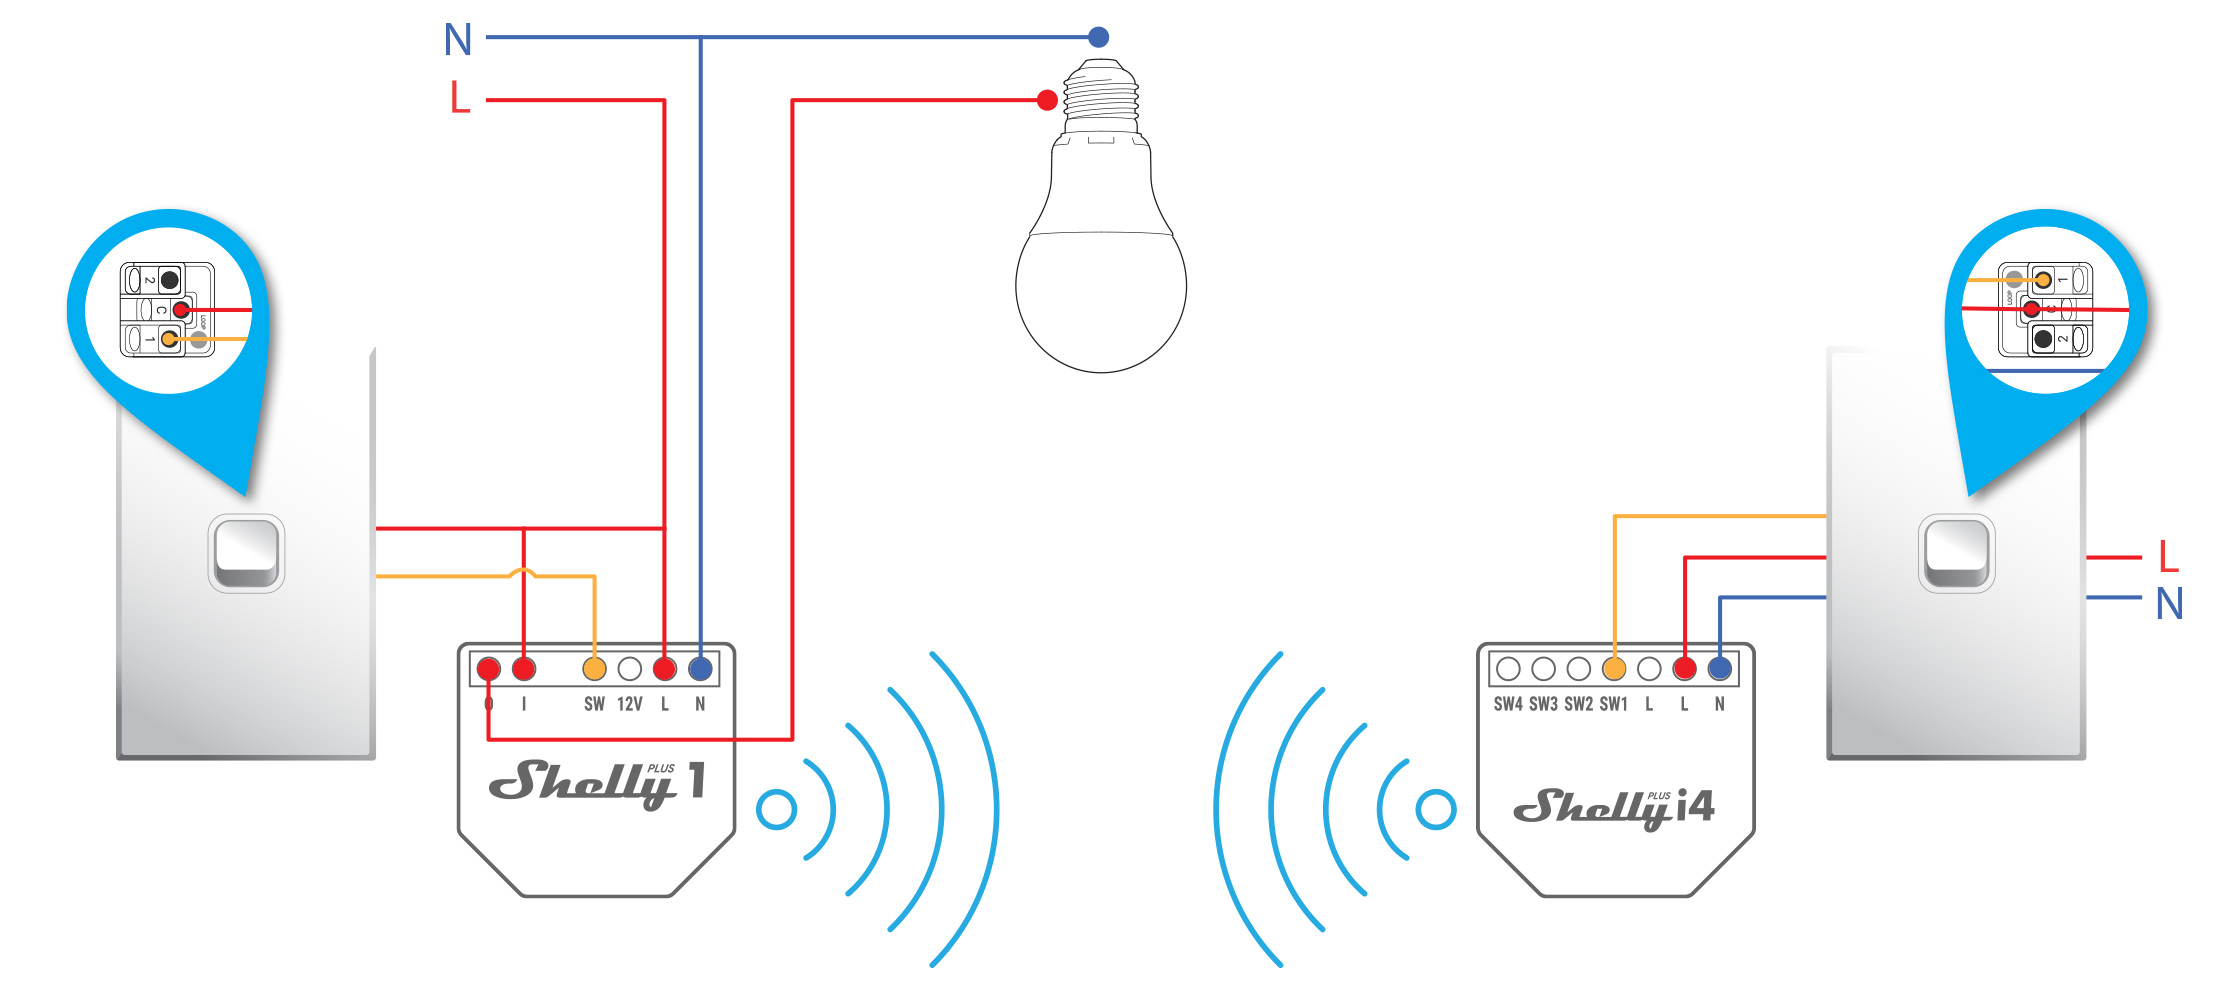
Illustration for educational purposes only. Never do your own electrical work.
On the left, we are using the Shelly 1 Plus, which is connected to the main switch and the attached light(s). On the right, we are using the Shelly I4 (AC), which is connected to our second switch only. Using the free Shelly Smart Control app, we then instruct the I4 to control the Shelly 1 Plus.
This is an excellent solution to the wireless 2 way switch problem… we maintain control from the original switch as well as from the new secondary switch. Best of all, we also now have smart control of the lighting through the Shelly app or Alexa / Google Home.
Now that the physical installation is done (by a licensed electrician), let’s use the Shelly Smart Control app to complete the setup…
Installing the correct Shelly app


We will focus on using the Shelly Smart Control app – although this newer app is still in “beta” phase at the time of writing this blog, it will become the main Shelly app shortly (the older Shelly Cloud app will be discontinued).
We will use the Shelly Smart Control app to setup the wireless connection between the switches…
Setting the scene...
Using the Shelly Smart Control app, there are two ways we can do this… the easy way – and the better way.
The easy way...
We will create a simple scene in the Shelly app. This scene will simply toggle the Shelly 1 Plus (connected to the light) on and off when the switch connected to the Shelly I4 is switched.
Although this way is very simple to setup – it also relies on the Shelly “Cloud” to work. In other words, the “scene” is hosted in the “cloud”, which means it needs an internet connection to work – it will also be a bit slower than the next method I will show you to achieve the same result, but running locally (not from the “cloud”). But first, the easy way…

1. Open the Shelly app.

2. Select the “Home” icon.

3. Select “All Scenes”.

4. Select the “+” icon to create a new scene.

5. Give your scene a name.

6. Select a default image for your scene or upload your own – then select “Next”.

7. Select a room to store your scene and then “Next”.

8. Select “Add condition”.

9. Choose the “Room” and then the “Device” (in this case, Shelly I4) from the dropdown lists.

10. Select your desired “Device property” (in this case, “input state”).

11. Select a “trigger” – in this case… “When input turn state is on”. Now select “Save”.

12. Select “Next”.

13. Now add an “action” by selecting “Add action”.

14. Choose the “Room” and then the “Device” from the dropdown lists that you want to control (in this case, the Shelly module connected to your light).

15. Select an “action” – in this case… “toggle the state of the Shelly device”. Now select “Save”.

16. Select “Next”.

17. Select “Next” again.

18. Select “Save” and your first scene is done…
You will also need to create another identical scene to above – however in step 10, instead of selecting “When input state is turned on” – this time, we want to select “When input turn state is off”. The rest of the scene is identical.
What we have done… we have created two scenes – one to detect when the Shelly I4 is switched on – and the other to detect when it is switched off. Both scenes then toggle the light that is connected to a Shelly 1 Plus (or other Shelly relay module) – giving us a wireless 2 way switch (the switch connect to the Shelly 1 Plus will still work as normal).
So that was the easy way, now let’s look at the better way…
The better way...
Below is a solution that allows the Shelly I4 to talk to the Shelly 1 Plus directly, over your local network using the built-in “web-hooks”. This means that communication is faster as everything is processed locally (rather than through the “cloud”) and will even continue to work if your NBN goes down. Let’s get it done…
The first thing we need to do is find the IP address of the Shelly device that is connected to your lights (in this example, the Shelly 1 Plus) – follow this guide.
Now we have the IP address, we can use this very handy tool to craft our web-hook URL… Shelly HTTP API Command Control Tool.

Using the above tool, we simply enter the IP address of the Shelly device, select “Shelly Relay” as the device type and finally select “Toggle” from the Relay Command drop-down list – this will give us our web-hook URL (copy this to your clipboard).
With the Shelly Relay Control URL in hand, let’s add some “Actions” to our Shelly I4. This will trigger and control the Shelly 1 Plus each time the attached wall switch is… switched.
In the Shelly app…

1. Select the “Home” icon.

2. Select “All devices”.

3. Select your Shelly I4 device that is connected to your secondary switch.

4. Select the “Actions” icon.

5. Select “Add action”.

6. Give your “Action” a name and select “Next”.

7. Select “Next” (we don’t want to schedule this “Action”).

8. Choose “input on” from the drop-down list and select “Next”.

9. Paste the “Control URL” we created above – then select “Save”.

10. Select “Add action” again.

11. Give your “Action” a name (you can name it the same as step 6) and select “Next”.

12. Select “Next”.

13. This time, select “Input off” from the drop-down list and then “Next”.

14. Like step 9, paste the “Control URL” we created above – then select “Save”.

15. That’s it, we are done 🙂
Now when you flick the secondary switch attached to the Shelly I4, an “Action” (http command) will be sent over the local network to the Shelly 1 Plus (or other Shelly relay module) to toggle the connected light on/off. Brilliant.


